PVE直通
首先 需要在bios里开启vt-d csm并且video必须是legacy
独享直通
nano /etc/default/grub将
GRUB_CMDLINE_LINUX_DEFAULT="quiet" 替换为
GRUB_CMDLINE_LINUX_DEFAULT="quiet intel_iommu=on video=efifb:off"update-grub添加所需的系统模块
echo "vfio" >> /etc/modules
echo "vfio_iommu_type1" >> /etc/modules
echo "vfio_pci" >> /etc/modules
echo "vfio_virqfd" >> /etc/modules
屏蔽宿主机驱动,因为显卡直通给了虚拟机
echo "blacklist snd_hda_intel" >> /etc/modprobe.d/pve-blacklist.conf
echo "blacklist snd_hda_codec_hdmi" >> /etc/modprobe.d/pve-blacklist.conf
echo "blacklist i915" >> /etc/modprobe.d/pve-blacklist.conf
更新内核
update-initramfs -u基于GVT的共享直通
nano /etc/default/grubGRUB_CMDLINE_LINUX_DEFAULT="quiet intel_iommu=on iommu=pt i915.enable_gvt=1 video=efifb:off"update-grub添加模块
nano /etc/modulesvfio
vfio_iommu_type1
vfio_pci
vfio_virqfd
kvmgt允许不安全中断
nano /etc/modprobe.d/iommu_unsafe_interrupts.confoptions vfio_iommu_type1 allow_unsafe_interrupts=1避免死机
nano /etc/modprobe.d/kvm.confoptions kvm ignore_msrs=1update-initramfs -u重启后
ls /sys/bus/pci/devices/0000:00:02.0/mdev_supported_types这个文件夹下面有i915-GVT之类就是支持
然后在PVE webGUI下配置虚拟机及显卡直通就可以了 。
群晖杂记
直通测试
- 处理器选择的host
- bios使用的seaBIOS(默认)
- 机型使用的默认(i440fx)
将镜像文件转为磁盘
qm importdisk 虚拟机编号 /var/lib/vz/template/iso/123.img localls /dev/dri
cat /sys/kernel/debug/dri/0/i915\_frequency\_info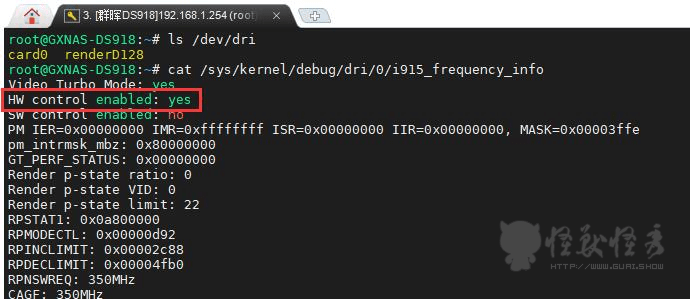
control enabled的后面是写yes还是no,
yes表示可以硬解。
安装ipkg包管理
sudo -iwget http://ipkg.nslu2-linux.org/feeds/optware/syno-i686/cross/unstable/syno-i686-bootstrap\_1.2-7\_i686.xsh chmod +x syno-i686-bootstrap\_1.2-7\_i686.xsh sh syno-i686-bootstrap\_1.2-7\_i686.xshipkg update#PATH=/sbin:/bin:/usr/sbin:/usr/bin:/usr/syno/sbin:/usr/syno/bin:/usr/local/sbin:/usr/local/bin
#export PATH解决使用非Photos客户端上传视频没有缩略图
安装社区ffmpeg插件使用脚本生成缩略图后,重建索引即可
这一版来自阿哈蛤)
#!/bin/bash

# 定义缩略图的宽或高的最大值
# 如果视频是竖版(宽小于高)则按宽缩放为WIDTH等比例缩放,如果视频是横版(宽大于等于高)则将高缩放为HEIGHT,
WIDTH=320
HEIGHT=320

# 遍历本目录下的视频文件
for file in ./*; do
    case "$file" in
        *.mp4|*.MP4|*.mov|*.MOV)
            filename=$(basename "$file")

            # 如果不存在,放缩略图的文件夹,创建
            mkdir -p "./@eaDir/$filename"
            echo "mkdir: ./@eaDir/$filename"

            # 检查是否已经有缩略图
            if [ ! -f "./@eaDir/$filename/SYNOPHOTO_THUMB_M.jpg" ]; then
                # 获取视频时长
                DURATION=$(ffprobe -v error -select_streams v:0 -show_entries format=duration -of csv=p=0 "$file")
                echo "Duration: $DURATION"

                # 获取视频分辨率
                RESOLUTION=$(ffprobe -v error -select_streams v:0 -show_entries stream=width,height -of csv=p=0:s=x "$file")
                w=$(echo $RESOLUTION | cut -d "x" -f 1)
                h=$(echo $RESOLUTION | cut -d "x" -f 2)

                # 计算截图间隔
                COUNT=2
                INTERVAL=$(awk "BEGIN {printf \"%d\", $DURATION/$COUNT}")

                # 根据视频宽高判断缩略图排列方式
                if [ $w -gt $h ]; then
                    tile_layout="1x2"  # 横屏视频
                else
                    tile_layout="2x1"  # 竖屏视频
                fi

                # 生成缩略图
                scale="${WIDTH}:-1"
                [ "$w" -lt "$h" ] && scale="-1:${HEIGHT}"

                ffmpeg4 -i "$file" -vf "fps=1/$INTERVAL,scale=$scale,tile=$tile_layout" "./@eaDir/$filename/SYNOPHOTO_THUMB_M.jpg" 2>/dev/null
                echo "Gen thumb file: ./@eaDir/$filename/SYNOPHOTO_THUMB_M.jpg"
            fi
            ;;
    esac
done
这一版来自AI可以遍历所有子目录
#!/usr/bin/python
# -*- coding:UTF-8 -*-
##190710
import os
import sys
import subprocess
import argparse

# 定义 ffprobe路径
ffprobe_path = '/var/packages/ffmpeg/target/bin/ffprobe'
# 定义 视频文件格式
types = ['.mp4','.avi','.wmv','.mkv','.flv','.mov']

# 解析命令行参数
parser = argparse.ArgumentParser()
parser.add_argument("-o", "--OverWrite", action="store_true", help="Overwrite SYNOPHOTO_THUMB_X.jpg files even existed")
args = parser.parse_args()

# 获取makethumb.py文件所在的路径
path = os.path.dirname(os.path.abspath(__file__))

# 定义函数SynoPhotoThumb,用于生成缩略图
def SynoPhotoThumb():
    # 遍历指定路径下的所有文件和子目录
    for dirpath, dirnames, filenames in os.walk(path):
        # 跳过@eaDir文件夹
        if '@eaDir' in dirpath:
            dirnames[:] = []
        try:
            # 尝试从文件列表中移除'SYNOPHOTO_FILM_H264.mp4'
            filenames.remove('SYNOPHOTO_FILM_H264.mp4')
            filenames.remove('SYNOPHOTO_FILM_M.mp4')
            filenames.remove('SYNOPHOTO_FILM_MPEG4.mp4')
        except:
            pass
        # 遍历当前目录下的所有文件
        for name in filenames:
            # 获取文件扩展名
            _, ext = os.path.splitext(name)
            # 如果文件的扩展名在types集合中,那么就为这个文件生成缩略图
            if ext.lower() in types:
                videopath = os.path.join(dirpath, name)
                rootpath = str(dirpath)
                videoname = str(name)

                # 删除生成的.fail文件
                shell = 'rm -f "%s/@eaDir/%s/*.fail"' % (rootpath, videoname)
                os.system(shell)

                # 确保缩略图的目录存在,如果不存在要创建,不然ffmpeg会报错,因为ffmpeg不能主动创建目录。
                thumb_dir = os.path.join(rootpath, '@eaDir', videoname)
                os.makedirs(thumb_dir, exist_ok=True)

                thumb_m_path  = os.path.join(rootpath, '@eaDir', videoname, 'SYNOPHOTO_THUMB_M.jpg')
                thumb_xl_path = os.path.join(rootpath, '@eaDir', videoname, 'SYNOPHOTO_THUMB_XL.jpg')

                # 如果发现有已有缩略图错误,可以使用-o 强制覆盖。
                if (not os.path.exists(thumb_m_path)) or args.OverWrite:
                    print('Create SYNOPHOTO_THUMB_M.jpg of %s' % thumb_m_path)
                    shellM = 'ffmpeg4 -loglevel warning -ss "$("%s" -loglevel error -of csv=p=0 -show_entries format=duration "%s" | awk \'{print $1/2}\')" -i "%s" -y -vframes 1 -vf scale=-1:1280 "%s"' % (ffprobe_path, videopath, videopath, thumb_m_path)
                    resultM = subprocess.run(shellM, shell=True, stdout=subprocess.PIPE, stderr=subprocess.PIPE)
                    if resultM.returncode != 0:
                        print('Error executing command:', resultM.stderr.decode())
                    else:
                        print('Created!', resultM.stdout.decode())

                if (not os.path.exists(thumb_xl_path)) or args.OverWrite:
                    print('Create SYNOPHOTO_THUMB_XL.jpg of %s' % thumb_xl_path)
                    shellXL = 'ffmpeg4 -loglevel warning -ss "$("%s" -loglevel error -of csv=p=0 -show_entries format=duration "%s" | awk \'{print $1/2}\')" -i "%s" -y -vframes 1 -vf scale=-1:480 "%s"' % (ffprobe_path, videopath, videopath, thumb_xl_path)
                    resultXL = subprocess.run(shellXL, shell=True, stdout=subprocess.PIPE, stderr=subprocess.PIPE)
                    if resultXL.returncode != 0:
                        print('Error executing command:', resultXL.stderr.decode())
                    else:
                        print('Created!', resultXL.stdout.decode())

                # 检查目录是否为空,如果为空就删除,意味着缩略图创建失败
                if not os.listdir(thumb_dir):
                    os.rmdir(thumb_dir)
    return

SynoPhotoThumb()
print('SynoPhotoThumb_Generater Finished!')
PVE的优化
脚本一键优化
ve_source是老虎大佬开发的pve脚本(首发于X86派论坛),可以更方便的初始化PVE,无需使用复杂的命令,使用方法很简单,登录PVE,打开Shell粘贴如下命令。
wget -q -O /root/pve_source.tar.gz 'https://bbs.x86pi.cn/file/topic/2023-11-28/file/01ac88d7d2b840cb88c15cb5e19d4305b2.gz' && tar zxvf /root/pve_source.tar.gz && /root/./pve_source手动优化
合并默认的分区 local 和 local-lvm
lvs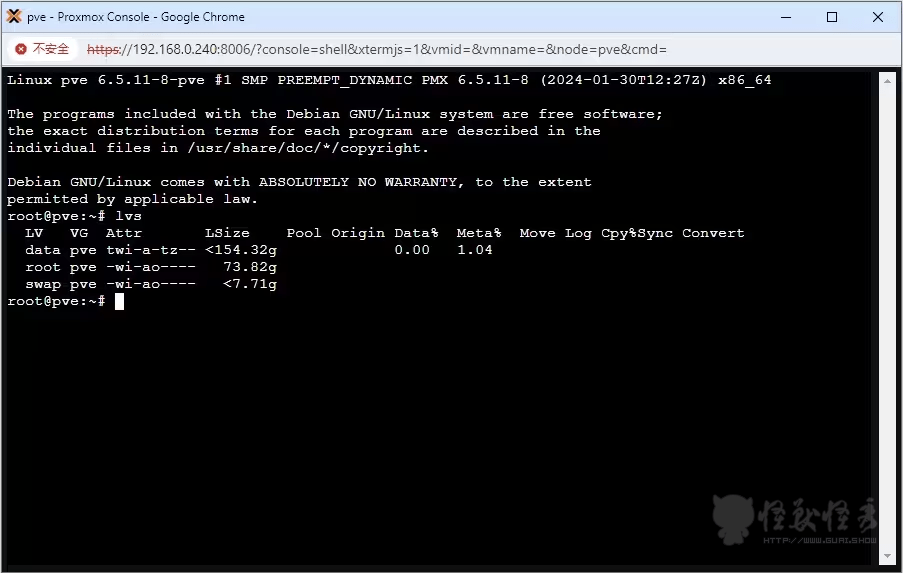
删除lvm分区(请一定确保删除的时候分区内没有数据)
lvremove pve/data将空出来的空间分给local
lvextend -l +100%FREE -r pve/root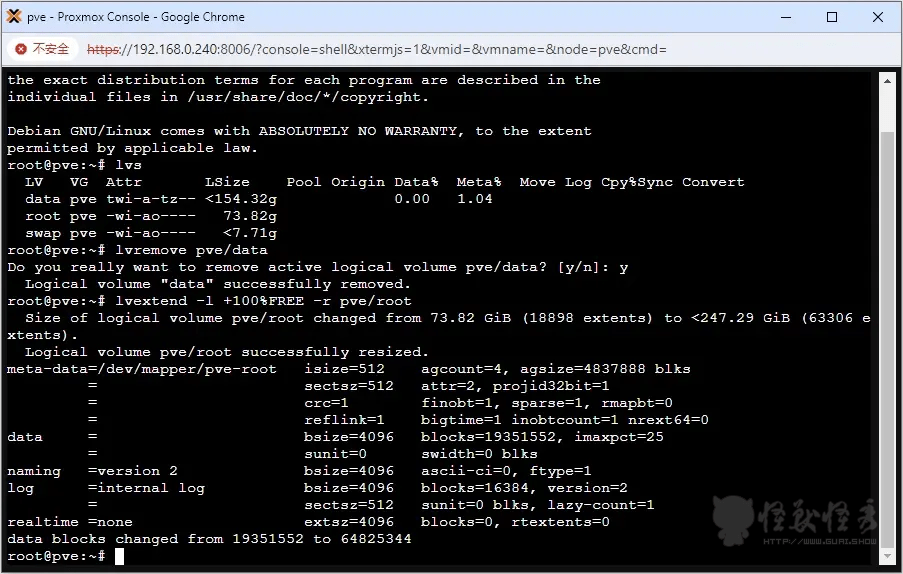
返回webGUI下 在数据中心-存储-删除local-lvm并调整local,允许存放所有类型的内容。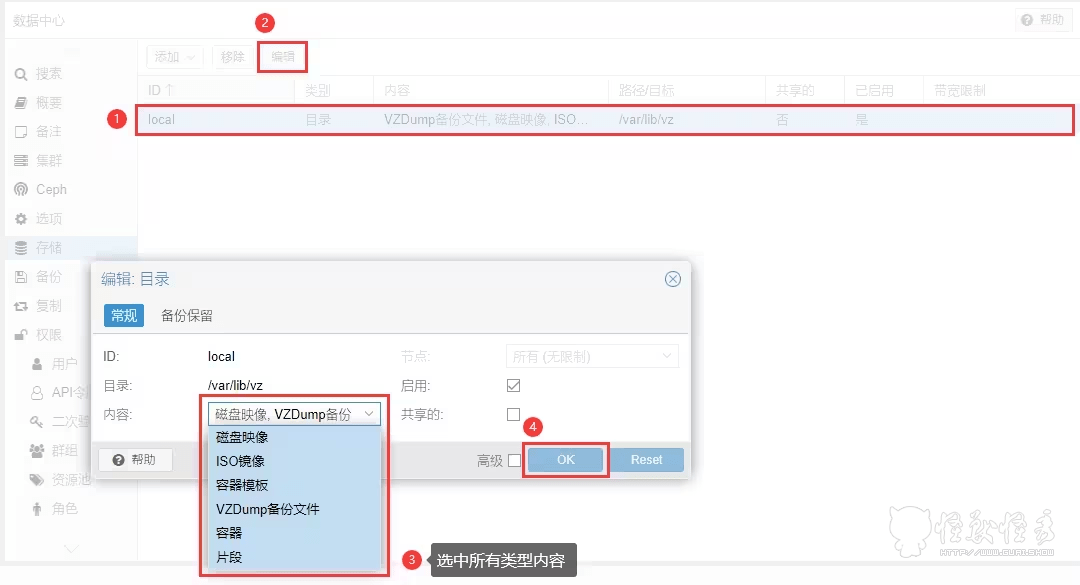
最后检查local,获取了先前local-lvm的硬盘空间即正确完成。
替换APT源镜像并检查软件更新
2.1 进入PVE的shell命令行
2.2 取消企业源
这一步是取消PVE自带的企业订阅,文件位于:/etc/apt/sources.list.d/pve-enterprise.list 和 /etc/apt/sources.list.d/ceph.list
付费订阅,未认证的个人如果不取消会在apt更新信息的时候报错。
执行:
nano /etc/apt/sources.list.d/pve-enterprise.list注释里面的企业源(在行前面加 #)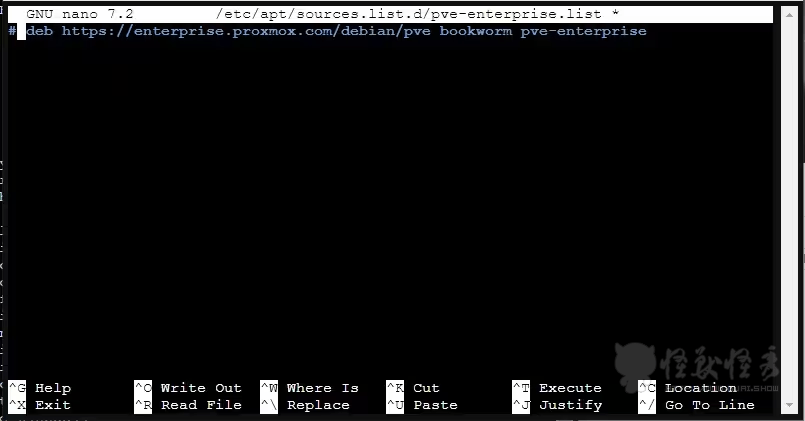
(PVE8版本新增)执行:
nano /etc/apt/sources.list.d/ceph.list同上注释里面的企业源
2.3 更换apt源为阿里云源
这一步是将默认的Debian源替换为国内的镜像源,保证网络连接,提升 apt update / upgrade 的速度。
执行:
nano /etc/apt/sources.list注释其中原有的源,并更换源为PVE对应Debian版本的阿里源:
如果是 PVE 8 版本,替换为Debian12的源:
deb https://mirrors.aliyun.com/debian/ bookworm main non-free non-free-firmware contrib
deb-src https://mirrors.aliyun.com/debian/ bookworm main non-free non-free-firmware contrib
deb https://mirrors.aliyun.com/debian-security/ bookworm-security main
deb-src https://mirrors.aliyun.com/debian-security/ bookworm-security main
deb https://mirrors.aliyun.com/debian/ bookworm-updates main non-free non-free-firmware contrib
deb-src https://mirrors.aliyun.com/debian/ bookworm-updates main non-free non-free-firmware contrib
deb https://mirrors.aliyun.com/debian/ bookworm-backports main non-free non-free-firmware contrib
deb-src https://mirrors.aliyun.com/debian/ bookworm-backports main non-free non-free-firmware contrib
如果是 PVE 7 版本,替换为Debian11的源:
deb http://mirrors.aliyun.com/debian/ bullseye main non-free contrib
deb-src http://mirrors.aliyun.com/debian/ bullseye main non-free contrib
deb http://mirrors.aliyun.com/debian-security/ bullseye-security main
deb-src http://mirrors.aliyun.com/debian-security/ bullseye-security main
deb http://mirrors.aliyun.com/debian/ bullseye-updates main non-free contrib
deb-src http://mirrors.aliyun.com/debian/ bullseye-updates main non-free contrib
deb http://mirrors.aliyun.com/debian/ bullseye-backports main non-free contrib
deb-src http://mirrors.aliyun.com/debian/ bullseye-backports main non-free cont
更新源并检查软件更新
apt update && apt upgrade -y美化
虚拟机限制标签
依次点击数据中心➡选项→标记样式设定→树形结构 选择完整,然后保存就行了
点击虚拟机默认有一个 没有标记,添加自定义标记即可
数据中心➡选项→标记样式设定 修改对应标签颜色
参考了以下文章:「
请教个pve关机的问题
2024年PVE8最新安装使用指南|新手入门|安装|优化|Proxmox VE 8.1
如何通过名称而不是彩色点显示 VM 列表中的标签?
【授人鱼不如授人以渔】给9代10代CPU安装的群晖系统打上核显补丁开启硬解
ProxmoxVE 操作系统安装与基本配置 - 从零开始的NAS/小型服务器搭建
#群晖系统Synology DSM安装ipkg包管理
PVE直通核显
群晖为任意文件夹下的视频文件生成(拼接)缩略图
PVE虚拟机下直通核显安装黑群、jellyfin
」


Comment here is closed